Introduction

Meet EventSale System

Running a Second Life event is much more than opening a shopping location and waiting for creators to arrive. You have applications to answer, deadlines to coordinate, products to review, payments to follow, announcements to send, and a public event that needs to look ready every day.

EventSale System brings those responsibilities into one workspace built for the person running the event. It gives you a clear place to plan each round, welcome creators, review what they submit, publish the event, and keep the people around you informed.

You remain in control as the event owner, but you do not have to do everything alone. EventSale lets you invite trusted managers and give them the access they need for daily work. A manager can help with applications, submissions, the public website, communication, or other areas according to the role you assign, while ownership of the workspace stays with you.

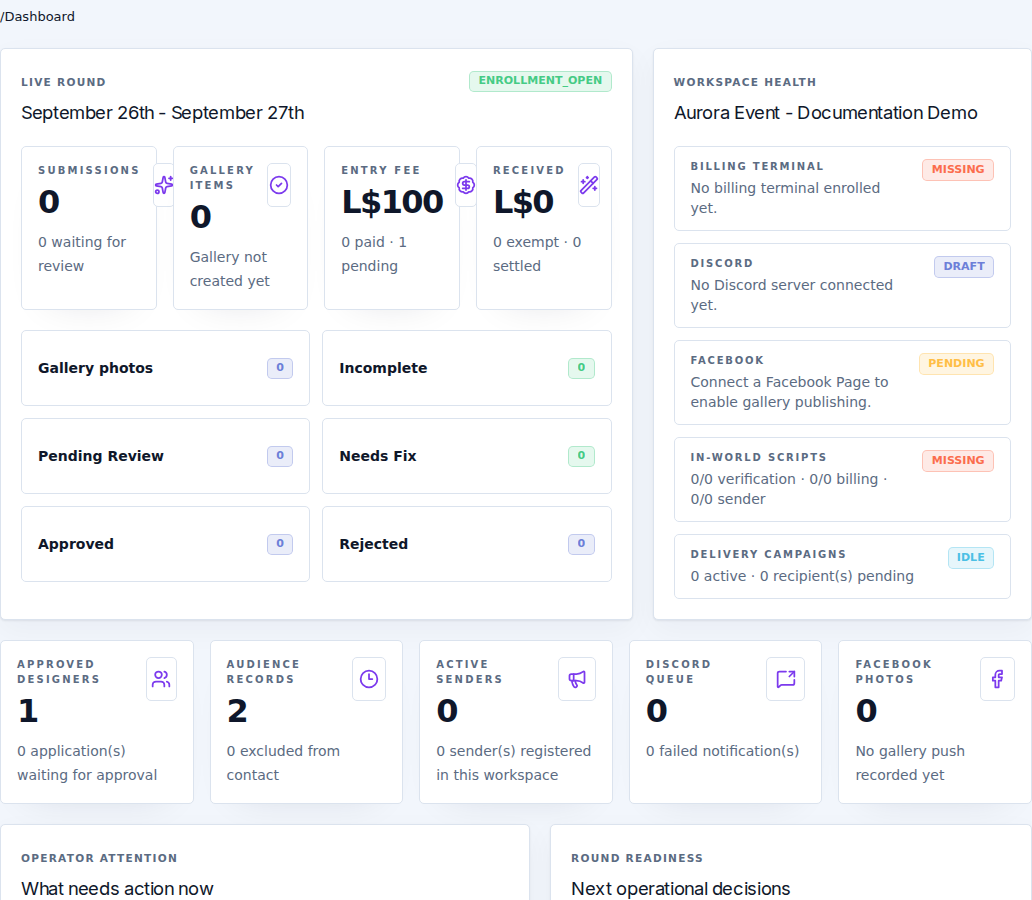
EventSale workspace dashboard showing the current round, event health, submissions, gallery, audience, and communication status

The dashboard is designed to answer a practical question first: what needs my attention before the event is ready? From one screen, you can see the current round, creator and submission activity, gallery progress, payments, audience growth, and the status of the connections that support your event.

What EventSale helps you run

Plan rounds instead of managing dates in scattered messages

An EventSale event is organized into rounds. Each round has its own schedule, enrollment period, payment period, event dates, gallery, fee, and publication state. This makes it easier to run a weekly, monthly, or seasonal event without losing track of which dates belong to which release.

You can see which round is being prepared, which one is live, which one is waiting for review, and which ones are already part of your history. When the next round is ready, the same workspace continues with the new schedule instead of starting from zero.

EventSale rounds page with round schedules, fees, enrollment, event dates, and status

The Operations area gives you a closer view of the current round. It brings together enrollment, payment, automatic publishing, gallery, and scheduler controls so that the event team can understand what is open, what is closed, and what still needs preparation.

Welcome creators through an application process that fits your event

Your public application form is part of your event experience. You can shape its layout and request the information that matters to your event, while EventSale keeps the essential identity and verification steps protected.

The standard creator journey guides an applicant through:

  1. basic information;
  2. Second Life identity verification;
  3. store details and links;
  4. social media information; and
  5. a creator portal password.

The verification step connects the application to the avatar applying. This helps the event team know who is behind the application before approving access.

EventSale application layout with the guided creator onboarding steps

You can see the public application experience in the EventSale application demo. This is the page a creator uses to apply to your event; it is separate from the private operator dashboard.

EventSale creator application page in the public event portal

If you are moving an existing event into EventSale, you can also import creator applications from a supported spreadsheet or delimited file. The import process gives you a preview, column mapping, duplicate and invalid-row checks, and a clear result before anything is accepted. Imported creators still complete the required identity confirmation when they first access the event.

EventSale creator application import with file preview and field mapping

Review applications and submissions with a visible workflow

Applications and submissions are different stages of the event:

  • Applications decide whether a creator is accepted into the event.
  • Submissions contain the products and information that an approved creator sends for a particular round.

The application queue lets the team approve, reject, suspend, or export applications. Once approved, a creator can access the creator portal and work on the current round.

The submission queue keeps each entry visible as it moves through the event:

  • incomplete;
  • pending review;
  • needs fix;
  • approved; or
  • rejected.

Reviewers can check the creator, categories, product information, images, links, placement, and payment status before deciding what happens next. Needs Fix gives the creator a chance to correct an entry without losing the work already submitted.

EventSale submissions queue showing entries waiting for review

This is especially useful when more than one person is reviewing the event. Instead of asking in chat which creators are finished, the team can work from the same queue and see the current decision for every submission.

The creator experience

EventSale is not only an operator dashboard. After a creator is approved, that creator receives a dedicated area inside the event portal. The creator does not need to work inside your private event workspace: they log in to the event portal and see the rounds, submissions, profile, and actions that apply to them.

Applying to the event and joining a round are two different steps

The creator applies to your event once through the public application form. That application creates the creator's profile for your workspace and goes to your team for approval.

After approval, the creator does not need to repeat the full application every week. Each new round is handled as an enrollment and submission inside the creator portal:

  1. the event owner opens enrollment for a round;
  2. the approved creator opens the active round from the creator dashboard;
  3. the creator confirms the profile information used for that round;
  4. the creator adds the categories, products, images, prices, and links requested by the event;
  5. the creator attaches or completes the required payment, when the round has a fee;
  6. the creator reviews the checklist and submits the round entry; and
  7. the event team reviews, approves, requests changes, or rejects that submission.

This distinction lets you approve a creator once while still reviewing what that creator brings to every individual round. A creator can be approved for the event but still have no active submission, an incomplete draft, a pending payment, or a submission waiting for review.

The creator dashboard

The creator dashboard shows the most important information first:

  • whether the creator is approved and active;
  • which round is currently open;
  • the enrollment and event dates;
  • whether payment is pending, paid, or exempt;
  • the current submission status; and
  • the next action needed to continue.

The creator can see a saved draft, continue editing it, or submit it when everything is ready. This prevents the creator from having to guess whether the event is open or whether a previous submission was actually received.

EventSale creator dashboard with the active round, submission status, payment status, and next action

The five-step round submission

The round submission is a guided five-step process designed to keep the creator and the event team working from the same information:

  1. Profile details — confirm the email, store name, owner name, store SLURL, marketplace link, and social links used for the round. When information changes, the creator can identify the changed field instead of silently replacing important context.
  2. Categories — select the categories that describe the products being submitted. The available categories come from the event's settings.
  3. Items and ads — add the products for the round, including item names, prices, images, product links, and any other fields required by the event's submission policy.
  4. Additional information — provide the extra details requested by the event, such as notes, media, or promotional information.
  5. Review and save — check the complete entry, see anything still missing, save the draft, and submit it for the event team to review.

The portal keeps a checklist beside the form. It can show whether at least one category was selected, whether an item was added, whether each item has its name, price, and image, and whether the weekly payment is attached or exempt. The creator can correct the draft before sending it to the review queue.

EventSale creator submission wizard with the five round-entry steps and live round context

Once submitted, the entry becomes Pending Review. The event team can approve it, reject it, or choose Needs Fix so the creator can correct the material and submit it again. If the creator is still working, the entry remains a draft and does not appear as approved public content.

Profile, history, and creator assistance

The creator's Profile area keeps public creator information up to date. The creator can edit the display name and brand name, while the protected Second Life avatar identity remains available for reference. The creator can also change the password used for this event portal without changing the event owner's settings.

EventSale creator profile with editable public details and password management

The History area records the creator's previous rounds and submissions. It shows the round, status, number of items, and review state so the creator can understand past participation without asking the event team to search through old messages.

EventSale creator history showing previous rounds, submission status, and review information

Creators can invite their own assistants when they need help. The creator manager is invited through in-world verification and can receive a specific role such as Manager, Finance, Submitter, or Readonly. This allows help with submissions or payments without giving an assistant access to the entire event workspace.

EventSale creator managers area with delegated roles and in-world onboarding

Give creators and visitors a complete public event website

EventSale includes a public website for your event. It is not just an application link: it is the place where visitors can understand what the event is, see who is participating, browse the current gallery, and find the people responsible for the event.

The homepage can include and reorder sections such as:

  • event branding, logo, slogan, and hero content;
  • banners and promotional artwork;
  • partner or sponsor images;
  • the current gallery;
  • previous rounds and their galleries;
  • frequently asked questions;
  • the public event team; and
  • links for creator applications and other important destinations.

EventSale public homepage builder with configurable event sections

You can see the visitor experience in the EventSale public site demo. The public site is generated from the information and sections you configure in EventSale, so the event owner can maintain the presentation without building a separate website.

EventSale public event website with the event presentation and published content

The public portal gives visitors and creators a clear navigation path:

  • Home presents the event, brand, banners, partners, current highlights, FAQ, and important links;
  • Current Rounds shows the products that have been published for the active round;
  • Past Rounds preserves the public history of previous releases and their galleries;
  • Team introduces the people operating the event and can show their presence information;
  • Apply as Designer opens the creator application form; and
  • Dashboard takes an approved creator to the creator portal.

EventSale public current-round page where published products become visible

EventSale public Previous Rounds Gallery with archived event releases

The public team section is separate from private staff permissions. It lets you introduce the managers who should be visible to visitors, including their profile links and presence information, without exposing your internal workspace controls.

EventSale public team configuration for the event website

EventSale public team page showing the people behind the event

When the event is ready, you can use the CaveTech event address or connect a custom domain for a more recognizable public presence.

Build and publish galleries for each round

Galleries give each round a lasting public presentation. You can prepare a gallery, add and organize photos, choose a cover, check its publication state, and publish it only when the event content is ready.

The gallery area also keeps the history of previous rounds available, so visitors can discover what the event has already hosted while the current round remains the main focus.

EventSale galleries page showing published and draft round galleries

This separation between a working gallery and a published gallery is important: your team can prepare content privately, review it, and publish a finished presentation instead of exposing unfinished material while the event is still being assembled.

Publishing a gallery is also what connects the round to the public channels. When you publish the gallery in EventSale, the approved gallery content is automatically reflected on the event's public website. The current round can appear in the current gallery area, and completed rounds can remain available as previous rounds according to the event's publication flow.

If Facebook is connected, EventSale also sends the published gallery to the Facebook destination configured for the event. Because of a limitation imposed by Facebook, the event team currently needs to create the album or group destination for each new round. After that destination exists and the connection is ready, EventSale handles the gallery publication and delivery for that round. We are working toward a better way to automate this remaining Facebook step as well.

This means the event owner does not need to upload the same gallery separately to the website and Facebook. The gallery is prepared once in EventSale, reviewed by the team, and then distributed through the connected channels when it is published.

Keep payments and Second Life connections visible

EventSale connects the online workspace to the parts of the event that happen inside Second Life. The payment terminal receives the round fee, while the verification object confirms the identity of creators and other authorized participants when the event requires it.

The Payments area gives you a ledger for round payments and a list of the terminals enrolled in the workspace. Your team can check who paid, when the payment was received, which round it belongs to, and whether a terminal is still active.

EventSale payments page with the payment ledger and enrolled terminals

The dashboard also exposes the health of the connections and automations that support the event. That makes it easier to notice a disconnected terminal, verification object, or communication channel before it becomes a creator support problem.

Keep your audience organized and your communication intentional

The Audience area turns the people already connected to your event into an organized contact base. You can search contacts, add notes, use system-created groups, create your own segments, import contacts, and suppress people who should not receive future communication.

The Marketing area lets you choose an approved in-world sender and prepare campaigns for selected audience segments. You can use it to communicate opening dates, reminders, payment information, results, or other event messages while keeping delivery history visible.

EventSale audience contacts organized for event communication

EventSale marketing campaign workspace for preparing outbound communication

EventSale can also connect your event to Discord. You can choose the server and channels, prepare reusable message templates, send tests, create campaigns, and review delivery results. Facebook connectivity provides another route for sharing event and gallery updates when your event uses that channel.

EventSale Discord connection settings for the event workspace

EventSale Facebook connection settings for publishing event updates

Make the event feel like your own

The settings are there to make EventSale fit your event, not to make every event look the same. You can configure the public name, browser title, support contact, logo, favicon, colors, theme, categories, submission policy, operational defaults, payment information, and public address.

EventSale brand settings for the event name, support contact, logo, colors, and theme

You can also decide how creators work inside the event: which categories are available, what a submission must contain, whether verification is required, how payment is handled, and whether creators may invite their own assistants.

The people who use EventSale

EventSale is designed around several different people, each with a different responsibility:

PersonWhat they do
Event ownerOwns the workspace, controls the event settings, manages access, oversees billing, and makes the final decisions.
Event managerHelps operate the event day to day, according to the access granted by the owner. Managers can help with applications, reviews, content, the public site, or communication.
ReviewerFocuses on applications and creator submissions, helping the event move entries from review to approval or correction.
Finance memberHelps check payments and financial records without needing full event administration.
CreatorApplies to the event, maintains a profile, and submits products for the rounds they join.
Creator managerHelps one creator with delegated tasks such as submissions or finance. This person is not an internal manager of the whole event.
VisitorViews the public event website, galleries, team information, and other published content.

A typical EventSale round

Every event has its own rhythm, but a normal round often looks like this:

  1. Prepare the round — set dates, the fee, enrollment rules, and the public presentation.
  2. Open applications or enrollment — invite creators through the public portal or import an existing application list.
  3. Verify and approve creators — confirm identity, review applications, and activate the creators who fit the event.
  4. Collect submissions — creators add their categories, products, images, links, and other required information.
  5. Review and correct — reviewers approve complete entries or send them back with a request for changes.
  6. Confirm payments — follow the payment ledger and ensure the round's financial requirements are complete.
  7. Prepare the gallery and website — curate the current gallery, update banners or partners, and check the public homepage.
  8. Publish and announce — make the event visible and use the communication channels connected to the workspace.
  9. Close and continue — keep the round in the history, show it as a previous round, and prepare the next one when the schedule calls for it.

This sequence gives the owner a reliable overview while allowing managers to take care of the work assigned to them. The event does not depend on one person remembering every deadline in a private conversation.

Public experience and private control in one product

EventSale has two connected sides:

  • The private dashboard is where the owner and team plan, review, configure, and monitor the event.
  • The public event portal is where visitors and creators read the event information, apply, log in, and see published content.

Creators only receive the creator tools that become available to them. Approval opens their creator access; an open round determines whether they can submit; payment and submission rules determine whether an entry can move forward. Visitors see the polished public result, not the internal queues and operational decisions behind it.

Where to start

If you are setting up EventSale for the first time, follow this order:

  1. Initial Setup — create or access your CaveTech account, activate EventSale, connect the Second Life objects, and prepare the first round.
  2. Rounds and Galleries — understand the event calendar, publication states, and release flow.
  3. Applications and Submissions — configure the creator journey and review the work sent for each round.
  4. Site Homepage, Team, and Payments — prepare the public site, event staff presentation, and payment control.
  5. Audience, Marketing, Discord, and Facebook — organize contacts and connect the channels you use to reach your community.
  6. Public Portal and Application — understand what visitors and new creators see.
  7. Creator Portal and Creator Submissions and Managers — help approved creators and their assistants work inside the event.

You do not need to configure every feature before creating the workspace. Start with the event identity, first round, application flow, payment and verification objects, and public page. Add the communication integrations and additional managers as your event grows.

Built to leave you in control

EventSale is meant to make a busy event feel manageable. It gives you the structure to run repeatable rounds, the visibility to know what is happening, and the delegation tools to let a trusted team help without giving up ownership.

When you are ready, begin with Initial Setup. The rest of this documentation follows the same path your event will take: prepare, invite, review, publish, and grow.