Payment Terminal Setup
This guide will walk you through the process of configuring your CaveTech - Payment Terminal inside Second Life.
Prerequisites
Before setting up the payment terminal, make sure you have:
- A valid CaveTech account
- The CaveTech - Payment Terminal object from the folder you received
- Permission to rez objects on your land
Step 1: Rez the Terminal
- Open your inventory and locate the folder CaveTech - Rental System
- Find the item named CaveTech - Payment Terminal
- Drag the object from your inventory onto your land
🧠 Tip: Make sure the land allows object rezzing, otherwise the terminal won't appear.
Step 2: Accept Debit Permission
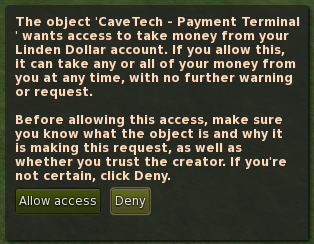
When you rez the terminal, a pop-up message will appear asking for debit permission:
"The object 'CaveTech - Payment Terminal' wants access to take money from your Linden Dollar account..."
You must click Allow access to enable the terminal to collect rent payments from tenants.

⚠️ Important: This permission is required to process rent payments automatically. If you deny it, the terminal will not work.
Next Steps
After setting up the terminal: